Stream Processing with RabbitMQ
For parts of this document where there is no explanation, please refer to the document Stream Processing with Apache Kafka The instructions were not copied over because they are exactly the same.
Prerequisites
To install and run the RabbitMQ docker image, run the following command:
docker run -d --hostname rabbitmq --name rabbitmq -p 15672:15672 -p 5672:5672 rabbitmq:3.7.14-management
docker run -d --name rabbit -p 15672:15672 -p 5672:5672 rabbitmq:management
Once installed, you can log in to the RabbitMQ management console on your local machine on http://localhost:15672. You can use the default account username and password: guest and guest.
Development
UsageDetailSender source
Business Logic
Now we can create the code required for this application. To do so:
- Create a UsageDetail class in the io.spring.dataflow.sample.usagedetailsender package that looks like the contents in UsageDetail.java. The UsageDetail class contains userId, data, and duration properties.
- Create the UsageDetailSender class in the io.spring.dataflow.sample.usagedetailsender package, which resembles the following listing:
package io.spring.dataflow.sample.usagedetailsender;

import java.util.Random;

import io.spring.dataflow.sample.domain.UsageDetail;

import org.springframework.beans.factory.annotation.Autowired;
import org.springframework.cloud.stream.annotation.EnableBinding;
import org.springframework.cloud.stream.messaging.Source;
import org.springframework.messaging.support.MessageBuilder;
import org.springframework.scheduling.annotation.EnableScheduling;
import org.springframework.scheduling.annotation.Scheduled;
@EnableScheduling
@EnableBinding(Source.class)
public class UsageDetailSender {

  @Autowired
  private Source source;

  private String[] users = {"user1", "user2", "user3", "user4", "user5"};

  @Scheduled(fixedDelay = 1000)
  public void sendEvents() {
    UsageDetail usageDetail = new UsageDetail();

    usageDetail.setUserId(this.users[new Random().nextInt(5)]);
    usageDetail.setDuration(new Random().nextInt(300));
    usageDetail.setData(new Random().nextInt(700));
    this.source.output().send(MessageBuilder.withPayload(usageDetail).build());
  }
}
The @EnableBinding annotation indicates that you want to bind your application to messaging middleware. The annotation takes one or more interfaces as a parameter — in this case, the Source interface that defines an output channel named output. In the case of RabbitMQ, messages sent to the output channel are in turn sent to the RabbitMQ message broker by using a TopicExchange.
The @EnableScheduling annotation indicates that you want to enable Spring’s scheduling capabilities, which invokes methods annotated with @Scheduled with the specified fixedDelay of 1 second.
The sendEvents method constructs a UsageDetail object and then sends it to the the output channel by accessing the Source object’s output().send() method.
Configuration
When configuring the source application, we need to set:
- The output binding destination (RabbitMQ exchange) where the producer publishes the data.
- The requiredGroups to specify the consumer groups to ensure the message delivery to consumer applications.
In src/main/resources/application.properties, you can add the following properties:
spring.cloud.stream.bindings.output.destination=usage-detail
spring.cloud.stream.bindings.output.producer.requiredGroups=usage-cost-consumer
- The spring.cloud.stream.bindings.output.destination property binds the UsageDetailSender object’s output to the usage-detail RabbitMQ exchange.
- The spring.cloud.stream.bindings.output.producer.requiredGroups property makes sure to create a durable queue named usage-detail.usage-cost-consumer, which consumes from the usage-detail RabbitMQ exchange.
Durable Queues
By default, the Spring Cloud Stream consumer application creates an anonymous auto-delete queue. This can result in a message not being stored and forwarded by the producer if the producer application started before the consumer application. Even though the exchange is durable, we need a durable queue to be bound to the exchange for the message to be stored for later consumption. Hence, for guaranteed message delivery, you need a durable queue.
To pre-create durable queues and bind them to the exchange, the producer application should set the following property:
spring.cloud.stream.bindings.<channelName>.producer.requiredGroups
The requiredGroups property accepts a comma-separated list of groups to which the producer must ensure message delivery. When this property is set, a durable queue is created by using the <exchange>.<requiredGroup> format.
Building
Testing
Spring Cloud Stream provides the spring-cloud-stream-test-support dependency to test the Spring Cloud Stream application. Instead of the RabbitMQ binder, the tests use the Test binder to trace and test your application’s outbound and inbound messages. The Test binder uses a utility class called MessageCollector, which stores the messages in-memory.
To unit test the UsageDetailSender application, add following code in the UsageDetailSenderApplicationTests class:
import java.util.concurrent.TimeUnit;

import com.fasterxml.jackson.databind.ObjectMapper;
import io.spring.dataflow.sample.UsageDetail;
import org.json.JSONObject;
import org.junit.Test;
import org.junit.runner.RunWith;

import org.springframework.beans.factory.annotation.Autowired;
import org.springframework.boot.test.context.SpringBootTest;
import org.springframework.cloud.stream.messaging.Source;
import org.springframework.cloud.stream.test.binder.MessageCollector;
import org.springframework.messaging.Message;
import org.springframework.test.context.junit4.SpringRunner;
import org.springframework.util.Assert;

import static org.junit.Assert.assertTrue;

@RunWith(SpringRunner.class)
@SpringBootTest(webEnvironment = SpringBootTest.WebEnvironment.RANDOM_PORT)
public class UsageDetailSenderApplicationTests {

        @Autowired
        private MessageCollector messageCollector;

        @Autowired
        private Source source;

        @Test
        public void contextLoads() {
        }

        @Test
        public void testUsageDetailSender() throws Exception {
                Message message = this.messageCollector.forChannel(this.source.output()).poll(1, TimeUnit.SECONDS);
                String usageDetailJSON = message.getPayload().toString();
                assertTrue(usageDetailJSON.contains("userId"));
                assertTrue(usageDetailJSON.contains("duration"));
                assertTrue(usageDetailJSON.contains("data"));
        }
}
- The contextLoads test case verifies that the application starts successfully.
- The testUsageDetailSender test case uses the Test binder’s MessageCollector to collect the messages sent by the UsageDetailSender.
UsageCostProcessor Processor
Business Logic
package io.spring.dataflow.sample.usagecostprocessor;

import io.spring.dataflow.sample.UsageCostDetail;
import io.spring.dataflow.sample.UsageDetail;

import org.springframework.cloud.stream.annotation.EnableBinding;
import org.springframework.cloud.stream.annotation.StreamListener;
import org.springframework.cloud.stream.messaging.Processor;
import org.springframework.messaging.handler.annotation.SendTo;

@EnableBinding(Processor.class)
public class UsageCostProcessor {

        private double ratePerSecond = 0.1;

        private double ratePerMB = 0.05;

        @StreamListener(Processor.INPUT)
        @SendTo(Processor.OUTPUT)
        public UsageCostDetail processUsageCost(UsageDetail usageDetail) {
                UsageCostDetail usageCostDetail = new UsageCostDetail();
                usageCostDetail.setUserId(usageDetail.getUserId());
                usageCostDetail.setCallCost(usageDetail.getDuration() * this.ratePerSecond);
                usageCostDetail.setDataCost(usageDetail.getData() * this.ratePerMB);
                return usageCostDetail;
        }
}
In the preceding application, the @EnableBinding annotation indicates that you want to bind your application to the messaging middleware. The annotation takes one or more interfaces as a parameter — in this case, the Processor that defines and input and output channel.
The @StreamListener annotation binds the application’s input channel to the processUsageCost method by converting the incoming JSON into UsageDetail object.
The @SendTo annotation sends the processUsageCost method’s output to the application’s output channel, which is, in turn, sent to the a RabbitMQ message broker by using a TopicExchange.
Configuring the UsageCostProcessor Application
When configuring the processor application, we need to set the following properties:
- The input binding destination (RabbitMQ exchange) where this application is subscribed through an anonymous auto-delete or durable queue.
- The group to specify the consumer group to which this consumer application belongs.
- The output binding destination (RabbitMQ exchange) where the producer publishes the data.
- The requiredGroups to specify the consumer groups to ensure the message delivery guarantee.
In src/main/resources/application.properties, you can add the following properties:
spring.cloud.stream.bindings.input.destination=usage-detail
spring.cloud.stream.bindings.input.group=usage-cost-consumer
spring.cloud.stream.bindings.output.destination=usage-cost
spring.cloud.stream.bindings.output.producer.requiredGroups=logger
- The spring.cloud.stream.bindings.input.destination and spring.cloud.stream.bindings.input.group properties bind the UsageCostProcessor object’s input to the usage-detail RabbitMQ exchange through the usage-detail.usage-cost-consumer durable queue.
- The spring.cloud.stream.bindings.output.destination property binds the UsageCostProcessor object’s output to the usage-cost RabbitMQ exchange.
- The spring.cloud.stream.bindings.output.producer.requiredGroups property makes sure to create a durable queue named usage-cost.logger, which consumes from the usage-cost RabbitMQ exchange.
There are many configuration options that you can choose to extend/override to achieve the desired runtime behavior when using RabbitMQ as the message broker. The RabbitMQ-specific binder configuration properties are listed in the RabbitMQ-binder documentation
Building
Now we can build the Usage Cost Processor application. In the usage-cost-processor directory, use the following command to build the project with Maven:
mvn clean package
Testing
package io.spring.dataflow.sample.usagecostprocessor;

import java.util.concurrent.TimeUnit;

import org.junit.Test;
import org.junit.runner.RunWith;

import org.springframework.beans.factory.annotation.Autowired;
import org.springframework.boot.test.context.SpringBootTest;
import org.springframework.cloud.stream.messaging.Processor;
import org.springframework.cloud.stream.test.binder.MessageCollector;
import org.springframework.messaging.Message;
import org.springframework.messaging.support.MessageBuilder;
import org.springframework.test.context.junit4.SpringRunner;

import static org.junit.Assert.assertTrue;

@RunWith(SpringRunner.class)
@SpringBootTest
public class UsageCostProcessorApplicationTests {

  @Autowired
  private Processor processor;

  @Autowired
  private MessageCollector messageCollector;

  @Test
  public void contextLoads() {
  }

  @Test
  public void testUsageCostProcessor() throws Exception {
    this.processor.input().send(MessageBuilder.withPayload("{\"userId\":\"user3\",\"duration\":101,\"data\":502}").build());
    Message message = this.messageCollector.forChannel(this.processor.output()).poll(1, TimeUnit.SECONDS);
    assertTrue(message.getPayload().toString().equals("{\"userId\":\"user3\",\"callCost\":10.100000000000001,\"dataCost\":25.1}"));
  }

}
- The test case contextLoads verifies the application starts successfully.
- The test case testUsageCostProcessor uses the Test binder’s MessageCollector to collect the messages from the UsageCostProcessor object’s output.
UsageCostLogger Sink
Business Logic
package io.spring.dataflow.sample.usagecostlogger;

import io.spring.dataflow.sample.UsageCostDetail;
import org.slf4j.Logger;
import org.slf4j.LoggerFactory;

import org.springframework.cloud.stream.annotation.EnableBinding;
import org.springframework.cloud.stream.annotation.StreamListener;
import org.springframework.cloud.stream.messaging.Sink;

@EnableBinding(Sink.class)
public class UsageCostLogger {

        private static final Logger logger = LoggerFactory.getLogger(UsageCostLoggerApplication.class);

        @StreamListener(Sink.INPUT)
        public void process(UsageCostDetail usageCostDetail) {
                logger.info(usageCostDetail.toString());
        }
}
In the preceding application, the @EnableBinding annotation indicates that you want to bind your application to the messaging middleware. The annotation takes one or more interfaces as a parameter — in this case, the Sink interface that defines an input channel.
The @StreamListener annotation binds the application’s input channel to the process method by converting the incoming JSON to a UsageCostDetail object.
Configuring the UsageCostLogger Application
When configuring the sink application, we need to set:
- The input binding destination (RabbitMQ exchange) to which this application is subscribed through an anonymous auto-delete or durable queue.
- The group to specify the consumer group to which this consumer application belongs.
In src/main/resources/application.properties, you can add the following properties:
spring.cloud.stream.bindings.input.destination=usage-cost
spring.cloud.stream.bindings.input.group=logger
The spring.cloud.stream.bindings.input.destination and spring.cloud.stream.bindings.input.group properties bind the UsageCostLogger object’s input to the usage-cost RabbitMQ exchange through the usage-cost.logger durable queue.
Building
Testing
To unit test the UsageCostLogger , add the following code in the UsageCostLoggerApplicationTests class:
package io.spring.dataflow.sample.usagecostlogger;

 import io.spring.dataflow.sample.UsageCostDetail;
 import org.junit.Test;
 import org.junit.runner.RunWith;
 import org.mockito.ArgumentCaptor;

 import org.springframework.beans.factory.annotation.Autowired;
 import org.springframework.boot.autoconfigure.EnableAutoConfiguration;
 import org.springframework.boot.test.context.SpringBootTest;
 import org.springframework.cloud.stream.annotation.EnableBinding;
 import org.springframework.cloud.stream.messaging.Sink;
 import org.springframework.context.annotation.Bean;
 import org.springframework.context.annotation.Primary;
 import org.springframework.messaging.support.MessageBuilder;
 import org.springframework.test.context.junit4.SpringRunner;

 import static org.mockito.Mockito.spy;
 import static org.mockito.Mockito.verify;

 @RunWith(SpringRunner.class)
 @SpringBootTest(webEnvironment = SpringBootTest.WebEnvironment.RANDOM_PORT)
 public class UsageCostLoggerApplicationTests {

        @Autowired
        protected Sink sink;

        @Autowired
        protected UsageCostLogger usageCostLogger;

        @Test
        public void contextLoads() {
        }

        @Test
        public void testUsageCostLogger() throws Exception {
                ArgumentCaptor<UsageCostDetail> captor = ArgumentCaptor.forClass(UsageCostDetail.class);
                this.sink.input().send(MessageBuilder.withPayload("{\"userId\":\"user3\",\"callCost\":10.100000000000001,\"dataCost\":25.1}").build());
                verify(this.usageCostLogger).process(captor.capture());
        }

        @EnableAutoConfiguration
        @EnableBinding(Sink.class)
        static class TestConfig {

                // Override `UsageCostLogger` bean for spying.
                @Bean
                @Primary
                public UsageCostLogger usageCostLogger() {
                        return spy(new UsageCostLogger());
                }
        }
 }
- The contextLoads test case verifies the application starts successfully.
- The testUsageCostLogger test case verifies that the process method of UsageCostLogger is invoked by using Mockito. To do this, the static TestConfig class overrides the existing UsageCostLogger bean to create a mock bean of UsageCostLogger. Since we are mocking the UsageCostLogger bean, the TestConfig also explicitly annotates @EnableBinding and @EnableAutoConfiguration.
Deployment
In this section, we deploy the applications we created earlier to the local machine, to Cloud Foundry, and to Kubernetes.
When you deploy these three applications ( UsageDetailSender , UsageCostProcessor and UsageCostLogger ), the flow of message is as follows:
UsageDetailSender -> UsageCostProcessor -> UsageCostLogger
The UsageDetailSender source application’s output is connected to the UsageCostProcessor processor application’s input. The UsageCostProcessor application’s output is connected to the UsageCostLogger sink application’s input.
When these applications run, the RabbitMQ binder binds the applications’ output and input boundaries into the corresponding exchanges and queues at RabbitMQ message broker.
Local
You can run the applications as standalone applications on your local environment.
To install and run the RabbitMQ docker image, run the following command:
docker run -d --hostname rabbitmq --name rabbitmq -p 15672:15672 -p 5672:5672 rabbitmq:3.7.14-management
Once installed, you can log in to the RabbitMQ management console on your local machine on http://localhost:15672. You can use the default account username and password: guest and guest.
Running the Source
By using the pre-defined configuration properties(along with a unique server port) for UsageDetailSender, you can run the application, as follows:
java -jar target/usage-detail-sender-rabbit-0.0.1-SNAPSHOT.jar --server.port=9001 &
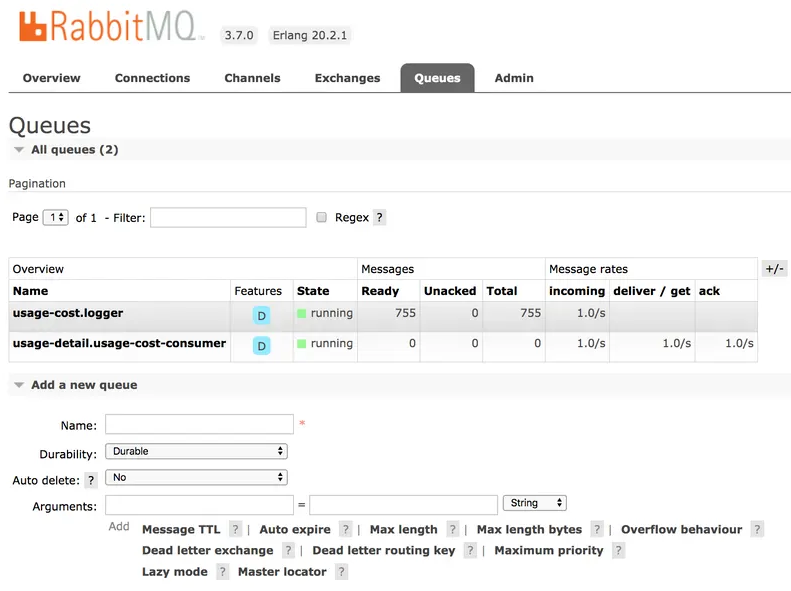
When this application is running, you can see that the usage-detail RabbitMQ exchange is created and the durable queue named usage-detail.usage-cost-consumer is bound to this exchange, as the following example shows:
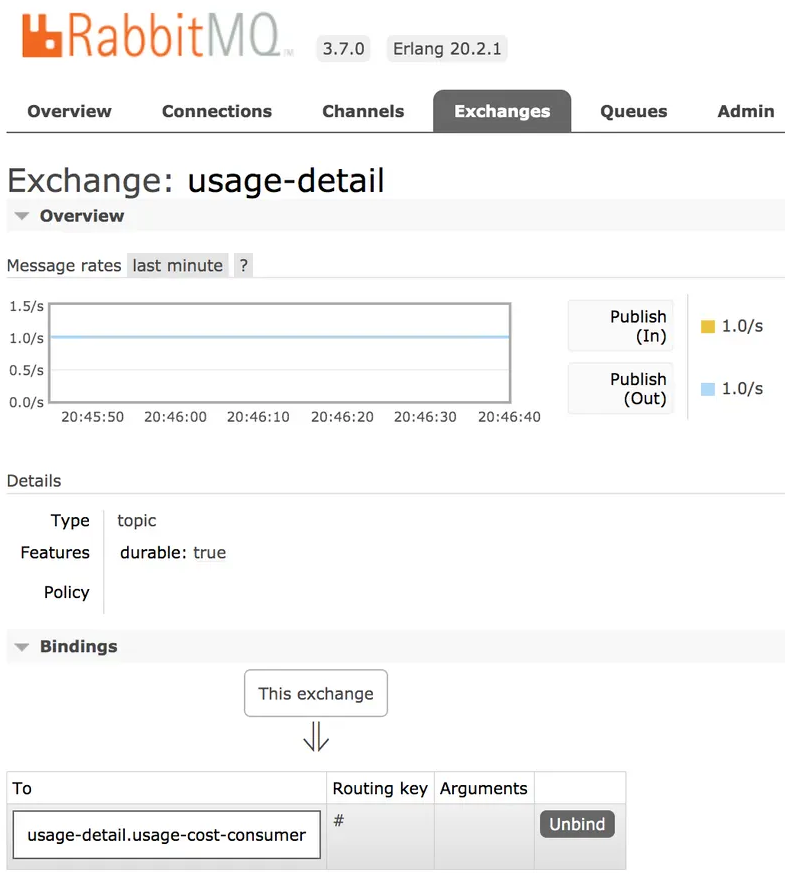
Also, if you click on the Queues and check the queue usage-detail.usage-cost-consumer, you can see the messages being consumed and stored in this durable queue, as the following example shows:

When configuring the consumer applications for this Source application, you can set the group binding property to connect to the corresponding durable queue.
NOTE: If you do not set the requiredGroups property, you can see that there is no queue for consuming the messages from the usage-detail exchange and, therefore, the messages are lost if the consumer is not up before this application is started.
Running the Processor
By using the pre-defined configuration properties (along with a unique server port) for UsageCostProcessor, you can run the application, as follows:
java -jar target/usage-cost-processor-rabbit-0.0.1-SNAPSHOT.jar --server.port=9002 &
From the RabbitMQ console, you can see:
- The UsageCostProcessor application consumes from the usage-detail.usage-cost-consumer durable queue, based on the spring.cloud.stream.bindings.input.group=usage-cost-consumer property.
- The UsageCostProcessor application produces the UsageCostDetail and sends it to the exchange usage-cost, based on the spring.cloud.stream.bindings.output.destination=usage-cost property.
- The usage-cost.logger durable queue is created. It consumes the messages from the usage-cost exchange, based on the spring.cloud.stream.bindings.output.producer.requiredGroups=logger property.
When this application is running, you can see that the usage-cost RabbitMQ exchange is created and the durable queue named usage-cost.logger is bound to this exchange, as the following image shows:
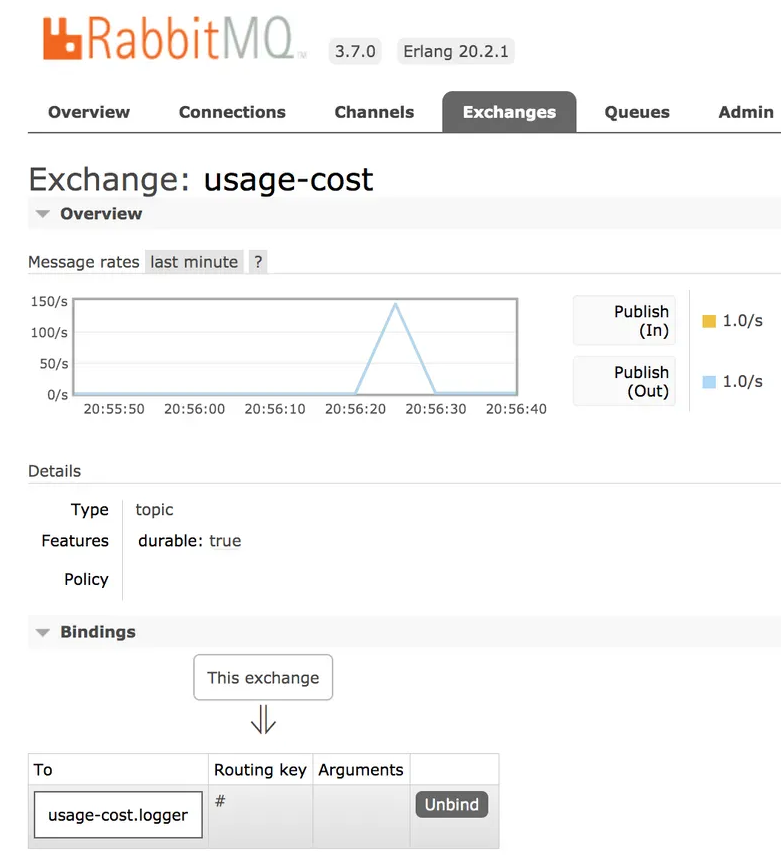
Also, if you click on the Queues and check the usage-cost.logger queue, you can see the messages being consumed and stored in this durable queue, as the following image shows:
Running the Sink
By using the pre-defined configuration properties (along with a unique server port) for UsageCostLogger, you can run the application, as follows:
java -jar target/usage-cost-logger-rabbit-0.0.1-SNAPSHOT.jar --server.port=9003 &
Now you can see that this application logs the usage cost detail it receives from the usage-cost RabbitMQ exchange through the usage-cost.logger durable queue, as the following example shows:
2019-05-08 08:16:46.442  INFO 10769 --- [o6VmGALOP_onw-1] i.s.d.s.u.UsageCostLoggerApplication     : {"userId": "user2", "callCost": "28.3", "dataCost": "29.8" }
2019-05-08 08:16:47.446  INFO 10769 --- [o6VmGALOP_onw-1] i.s.d.s.u.UsageCostLoggerApplication     : {"userId": "user2", "callCost": "12.0", "dataCost": "23.75" }
2019-05-08 08:16:48.451  INFO 10769 --- [o6VmGALOP_onw-1] i.s.d.s.u.UsageCostLoggerApplication     : {"userId": "user4", "callCost": "16.0", "dataCost": "30.05" }
2019-05-08 08:16:49.454  INFO 10769 --- [o6VmGALOP_onw-1] i.s.d.s.u.UsageCostLoggerApplication
Cloud Foundry
Creating a RabbitMQ service
To create a RabbitMQ service:
Log in to the PWS with your credentials. From the CF market place, create a RabbitMQ service instance that uses the cloudamqp service on the lemur plan, as follows:
cf create-service cloudamqp lemur rabbitmq
Cloud Foundry Deployment
You need to create a CF manifest YAML file called usage-detail-sender.yml for the UsageDetailSender to define its configuration properties, as follows
applications:
- name: usage-detail-sender
  timeout: 120
  path: ./target/usage-detail-sender-rabbit-0.0.1-SNAPSHOT.jar
  memory: 1G
  buildpack: java_buildpack
  services:
    - rabbitmq
Then you need to push the UsageDetailSender application by using its manifest YAML file, as follows:
cf push -f usage-detail-sender.yml
You need to create a CF manifest YAML file called usage-cost-processor.yml for the UsageCostProcessor to define its configuration properties, as follows
applications:
- name: usage-cost-processor
  timeout: 120
  path: ./target/usage-cost-processor-rabbit-0.0.1-SNAPSHOT.jar
  memory: 1G
  buildpack: java_buildpack
  services:
    - rabbitmq
Then you need to push the UsageCostProcessor application by using its manifest YAML file, as follows:
cf push -f usage-cost-processor.yml
You need to create a CF manifest YAML file called usage-cost-logger.yml for the UsageCostLogger to define its configuration properties, as follows:
 applications:
- name: usage-cost-logger
  timeout: 120
  path: ./target/usage-cost-logger-rabbit-0.0.1-SNAPSHOT.jar
  memory: 1G
  buildpack: java_buildpack
  services:
    - rabbitmq
Then you need to push the UsageCostLogger application by using its manifest YAML file, as follows:
cf push -f usage-cost-logger.yml
You can see the applications by running the cf apps command, as the folowing example (with output) shows:
cf apps
Output:
 name                   requested state   instances   memory   disk   urls
usage-cost-logger      started           1/1         1G       1G     usage-cost-logger.cfapps.io
usage-cost-processor   started           1/1         1G       1G     usage-cost-processor.cfapps.io
usage-detail-sender    started           1/1         1G       1G     usage-detail-sender.cfapps.io
Logs
2019-05-13T23:23:33.36+0530 [APP/PROC/WEB/0] OUT 2019-05-13 17:53:33.362  INFO 15 --- [e-cost.logger-1] i.s.d.s.u.UsageCostLoggerApplication     : {"userId": "user5", "callCost": "1.0", "dataCost": "12.350000000000001" }
  2019-05-13T23:23:33.46+0530 [APP/PROC/WEB/0] OUT 2019-05-13 17:53:33.467  INFO 15 --- [e-cost.logger-1] i.s.d.s.u.UsageCostLoggerApplication     : {"userId": "user1", "callCost": "19.0", "dataCost": "10.0" }
  2019-05-13T23:23:34.46+0530 [APP/PROC/WEB/0] OUT 2019-05-13 17:53:34.466  INFO 15 --- [e-cost.logger-1] i.s.d.s.u.UsageCostLoggerApplication     : {"userId": "user4", "callCost": "2.2", "dataCost": "5.15" }
  2019-05-13T23:23:35.46+0530 [APP/PROC/WEB/0] OUT 2019-05-13 17:53:35.469  INFO 15 --- [e-cost.logger-1] i.s.d.s.u.UsageCostLoggerApplication     : {"userId": "user3", "callCost": "21.0", "dataCost": "17.3" }
Kubernetes
This section walks you through how to deploy the three Spring Cloud Stream applications on Kubernetes.
Setting up the Kubernetes Cluster
For this we need a running Kubernetes cluster. For this example we will deploy to minikube.
https://dataflow.spring.io/docs/installation/kubernetes/#creating-a-kubernetes-cluster
https://minikube.sigs.k8s.io/docs/start/
Verifying Minikube is Running
To verify that Minikube is running, run the following command (shown with typical output if Minikube is running):
 $minikube status

host: Running
kubelet: Running
apiserver: Running
kubectl: Correctly Configured: pointing to minikube-vm at 192.168.99.100
Installing RabbitMQ
You can install the RabbitMQ message broker by using the default configuration from Spring Cloud Data Flow. To do so, run the following command:
kubectl apply -f https://raw.githubusercontent.com/spring-cloud/spring-cloud-dataflow/v2.7.2/src/kubernetes/rabbitmq/rabbitmq-deployment.yaml \
-f https://raw.githubusercontent.com/spring-cloud/spring-cloud-dataflow/v2.7.2/src/kubernetes/rabbitmq/rabbitmq-svc.yaml
Building Docker Images
Deploying the Stream
To deploy the stream, you must first copy and paste the following YAML and save it to usage-cost-stream.yaml:
kind: Pod
apiVersion: v1
metadata:
  name: usage-detail-sender
  labels:
    app: usage-cost-stream
spec:
  containers:
    - name: usage-detail-sender
      image: springcloudstream/usage-detail-sender-rabbit:0.0.1-SNAPSHOT
      ports:
        - containerPort: 80
          protocol: TCP
      env:
        - name: SPRING_RABBITMQ_ADDRESSES
          value: rabbitmq
        - name: SERVER_PORT
          value: '80'
  restartPolicy: Always

---
kind: Pod
apiVersion: v1
metadata:
  name: usage-cost-processor
  labels:
    app: usage-cost-stream
spec:
  containers:
    - name: usage-cost-processor
      image: springcloudstream/usage-cost-processor-rabbit:0.0.1-SNAPSHOT
      ports:
        - containerPort: 80
          protocol: TCP
      env:
        - name: SPRING_RABBITMQ_ADDRESSES
          value: rabbitmq
        - name: SERVER_PORT
          value: '80'
  restartPolicy: Always

---
kind: Pod
apiVersion: v1
metadata:
  name: usage-cost-logger
  labels:
    app: usage-cost-stream
spec:
  containers:
    - name: usage-cost-logger
      image: springcloudstream/usage-cost-logger-rabbit:0.0.1-SNAPSHOT
      ports:
        - containerPort: 80
          protocol: TCP
      env:
        - name: SPRING_RABBITMQ_ADDRESSES
          value: rabbitmq
        - name: SERVER_PORT
          value: '80'
  restartPolicy: Always
Then you need to deploy the apps, by running the following command:
kubectl apply -f usage-cost-stream.yaml
If all is well, you should see the following output:
pod/usage-detail-sender created
pod/usage-cost-processor created
pod/usage-cost-logger created
The preceding YAML specifies three pod resources, for the source, processor, and sink applications. Each pod has a single container that references the respective docker image.
We set the logical hostname for the RabbitMQ broker for each app to connect to it. Here we use the RabbitMQ service name, rabbitmq in this case. We also set the label app: user-cost-stream to logically group our apps.
Verifying the Deployment
You can use the following command to tail the log for the usage-cost-logger sink:
kubectl logs -f usage-cost-logger
You should see messages similar to the following messages:
 2019-05-02 15:48:18.550  INFO 1 --- [container-0-C-1] i.s.d.s.u.UsageCostLoggerApplication     : {"userId": "Mark", "callCost": "21.1", "dataCost": "26.05" }
2019-05-02 15:48:19.553  INFO 1 --- [container-0-C-1] i.s.d.s.u.UsageCostLoggerApplication     : {"userId": "Ilaya", "callCost": "4.2", "dataCost": "15.75" }
2019-05-02 15:48:20.549  INFO 1 --- [container-0-C-1] i.s.d.s.u.UsageCostLoggerApplication     : {"userId": "Mark", "callCost": "28.400000000000002", "dataCost": "15.0" }
2019-05-02 15:48:21.553  INFO 1 --- [container-0-C-1] i.s.d.s.u.UsageCostLoggerApplication     : {"userId": "Ilaya", "callCost": "16.8", "dataCost": "28.5" }
2019-05-02 15:48:22.551  INFO 1 --- [container-0-C-1] i.s.d.s.u.UsageCostLoggerApplication     : {"userId": "Mark", "callCost": "22.700000000000003", "dataCost": "20.3" }
2019-05-02 15:48:23.556  INFO 1 --- [container-0-C-1] i.s.d.s.u.UsageCostLoggerApplication     : {"userId": "Janne", "callCost": "16.6", "dataCost": "2.6" }
2019-05-02 15:48:24.557  INFO 1 --- [container-0-C-1] i.s.d.s.u.UsageCostLoggerApplication     : {"userId": "Janne", "callCost": "6.7", "dataCost": "1.0" }
2019-05-02 15:48:25.555  INFO 1 --- [container-0-C-1] i.s.d.s.u.UsageCostLoggerApplication     : {"userId": "Glenn", "callCost": "3.7", "dataCost": "2.6500000000000004" }
2019-05-02 15:48:26.557  INFO 1 --- [container-0-C-1] i.s.d.s.u.UsageCostLoggerApplication     : {"userId": "Janne", "callCost": "24.200000000000003", "dataCost": "32.9" }
2019-05-02 15:48:27.556  INFO 1 --- [container-0-C-1] i.s.d.s.u.UsageCostLoggerApplication     : {"userId": "Glenn", "callCost": "19.200000000000003", "dataCost": "7.4" }
2019-05-02 15:48:28.559  INFO 1 --- [container-0-C-1] i.s.d.s.u.UsageCostLoggerApplication     : {"userId": "Sabby", "callCost": "17.7", "dataCost": "27.35" }
2019-05-02 15:48:29.562  INFO 1 --- [container-0-C-1] i.s.d.s.u.UsageCostLoggerApplication     : {"userId": "Ilaya", "callCost": "26.8", "dataCost": "32.45" }
2019-05-02 15:48:30.561  INFO 1 --- [container-0-C-1] i.s.d.s.u.UsageCostLoggerApplication     : {"userId": "Janne", "callCost": "26.5", "dataCost": "33.300000000000004" }
2019-05-02 15:48:31.562  INFO 1 --- [container-0-C-1] i.s.d.s.u.UsageCostLoggerApplication     : {"userId": "Sabby", "callCost": "16.1", "dataCost": "5.0" }
2019-05-02 15:48:32.564  INFO 1 --- [container-0-C-1] i.s.d.s.u.UsageCostLoggerApplication     : {"userId": "Janne", "callCost": "16.3", "dataCost": "23.6" }
2019-05-02 15:48:33.567  INFO 1 --- [container-0-C-1] i.s.d.s.u.UsageCostLoggerApplication     : {"userId": "Ilaya", "callCost": "29.400000000000002", "dataCost": "2.1" }
2019-05-02 15:48:34.567  INFO 1 --- [container-0-C-1] i.s.d.s.u.UsageCostLoggerApplication     : {"userId": "Janne", "callCost": "5.2", "dataCost": "20.200000000000003" }
Cleaning up
To delete the stream, we can use the label we created earlier. The following command shows how to do so:
kubectl delete pod -l app=usage-cost-stream
To uninstall RabbitMQ, run the following command:
kubectl delete all -l app=rabbitmq