Understanding Google OAuth
Table of Contents
- Reference
- Prerequisites
- The process to obtain OAuth 2.0 access tokens
- Step 1: Generate a code verifier and challenge
- Step 2: Send a request to Google’s OAuth 2.0 server
- Step 3: Google prompts user for consent
- Step 4: Handle the OAuth 2.0 server response
- Step 5: Exchange authorization code for refresh and access tokens
- Step 6: Calling Google APIs
- Step 7: Refreshing an access token
Reference
- Using OAuth 2.0 to Access Google APIs: https://developers.google.com/identity/protocols/oauth2
- OAuth 2.0 for Mobile & Desktop Apps: https://developers.google.com/identity/protocols/oauth2/native-app
Prerequisites
- Create a project in Google Developer Console
- Enable whatever API you want this project to have access to (e.g. Calendar API)
- Create OAuth credentials with the proper scopes and download them.
- https://developers.google.com/identity/protocols/oauth2/native-app#creatingcred
- Consider the client_id and client_secret like the login id and password for your project.
- Identify access scopes
- Scopes enable your application to only request access to the resources that it needs while also enabling users to control the amount of access that they grant to your application. Thus, there may be an inverse relationship between the number of scopes requested and the likelihood of obtaining user consent.
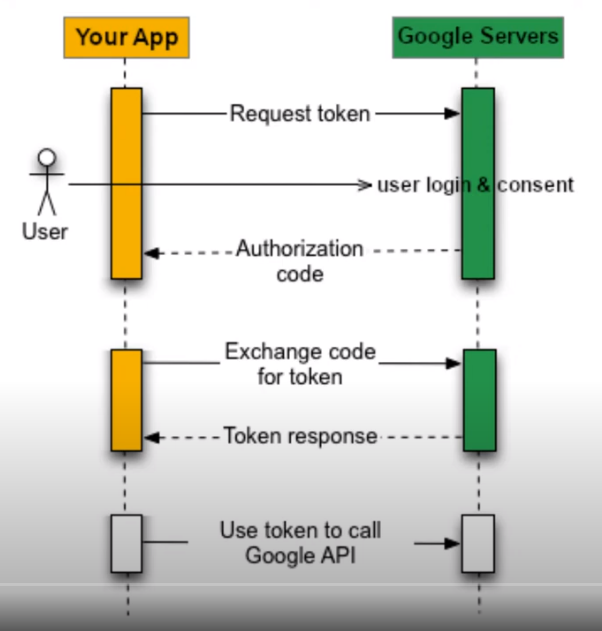
The process to obtain OAuth 2.0 access tokens
https://developers.google.com/identity/protocols/oauth2/native-app#obtainingaccesstokens
Step 1: Generate a code verifier and challenge
- This is Optional. Skip it.
Step 2: Send a request to Google’s OAuth 2.0 server
- The user comes to your application.
- Scopes for Google Calendar API: https://developers.google.com/calendar/api/auth
- Use a smaller scope - it thats what you want.
- The application needs to access data from Google API (e.g. Calendar API)
curl --location 'https://accounts.google.com/o/oauth2/v2/auth?client_id=<my-client-id>&redirect_uri=http%3A%2F%2Flocalhost&scope=https%3A%2F%2Fwww.googleapis.com%2Fauth%2Fcalendar&response_type=code' - The easiest way is to paste this in a browser. Curl requests don’t always seem to prompt the browser.
https://accounts.google.com/o/oauth2/v2/auth?client_id=<my-client-id>&redirect_uri=http%3A%2F%2Flocalhost&scope=https%3A%2F%2Fwww.googleapis.com%2Fauth%2Fcalendar&response_type=code
Step 3: Google prompts user for consent
- Google server will display a consent sceen to the user.
- The user grants permission for this application to access Google API.
- https://developers.google.com/identity/protocols/oauth2/native-app#handlingresponse
- The authorization server will return an authorization code to the caller.
- Your application is responsible for grabbing the authorization code from the response.
Step 4: Handle the OAuth 2.0 server response
- In Step 3, the user tells the server that he/she wants the application to have access to Google API.
- The response from the authorization code call will look like this (look in the browser address bar). This is the authorization code.
http://localhost/?code=<an-authorization-code-from-google>&scope=https://www.googleapis.com/auth/calendar - The authorization code is valid for very limited timeframes. 2 to 5 minutes. We can use it only once.
Step 5: Exchange authorization code for refresh and access tokens
- Use the authorization code from the previous step to get an access token
curl --location --request POST 'https://oauth2.googleapis.com/token?code=<an-authorization-code-from-google>&client_id=<my-client-id>&client_secret=<my-client-secret>&redirect_uri=http%3A%2F%2Flocalhost&grant_type=authorization_code' - The response will look like this:
{ "access_token": <an-access-token-from-google>, "expires_in": 3599, "refresh_token": <a-refresh-token-from-google>, "scope": "https://www.googleapis.com/auth/calendar", "token_type": "Bearer" } - What is the refresh_token? It can be used to request a new access_token.
Step 6: Calling Google APIs
- https://developers.google.com/identity/protocols/oauth2/native-app#callinganapi
- Google Calendar API overview: https://developers.google.com/calendar/api/guides/overview
- Events: https://developers.google.com/calendar/api/v3/reference/events
curl --location 'https://www.googleapis.com/calendar/v3/calendars/<a-calendar-id-from-google>/events' \
          --header 'Authorization: Bearer <an-access-token-from-google>'
Step 7: Refreshing an access token
- Do the refresh tokens ever expire? They should not.
- So, ideally, we should never have to do Step 2 again.
- https://developers.google.com/identity/protocols/oauth2/native-app#offline
curl --location --request POST 'https://oauth2.googleapis.com/token?refresh_token=<a-refresh-token-from-google>&client_id=<my-client-id>&client_secret=<my-client-secret>&grant_type=refresh_token'